Trash Raccoons
Devlog 2: Prototyping and design
Hello and welcome to our second devlog.
it's time for an update on our project, first and foremost we have decided to change our development from unreal to unity to speed up development, this means that this week we spend quite some time translating our ideas to unity and are making good progress on our project.
Let's have a look at this week's progress.
Translating the chosen art style in Unity 2020.3.30
After the move to Unity 2020.3.30 instead of Unreal Engine 4.27, this week’s challenge was figuring out how to translate our chosen art style into Unity.
How we did it will be explained in the following four parts:
Why switch to Unity?
As mentioned in our previous devlog: “While Unreal’s predetermined structure will slow down development at first, in the long run it will speed up, because Unreal Engine has a lot of built-in stuff for you that you’d have to implement yourself in Unity.”
After more experimentation, we have determined that the time it will take for Unreal Engine development time to surpass Unity’s is way longer than anticipated. Due to the relatively low scope of our project, it seemed best to switch to Unity, allowing us to focus more on implementing features rather than learning the engine.
How do character outline shaders work in unity?
For the readability of the characters we wanted to implement an outline, so every player is able to tell their own character apart from the others. We decided to go with a colored outline around the character, as is seen in the following picture. 
To have a clear separation of colors we went for 4 vibrant and distinct colors: yellow, blue, green, and red.

The outliner script we used is easily adjustable, according to our needs. We can quickly change the colors and width of the outline for example.
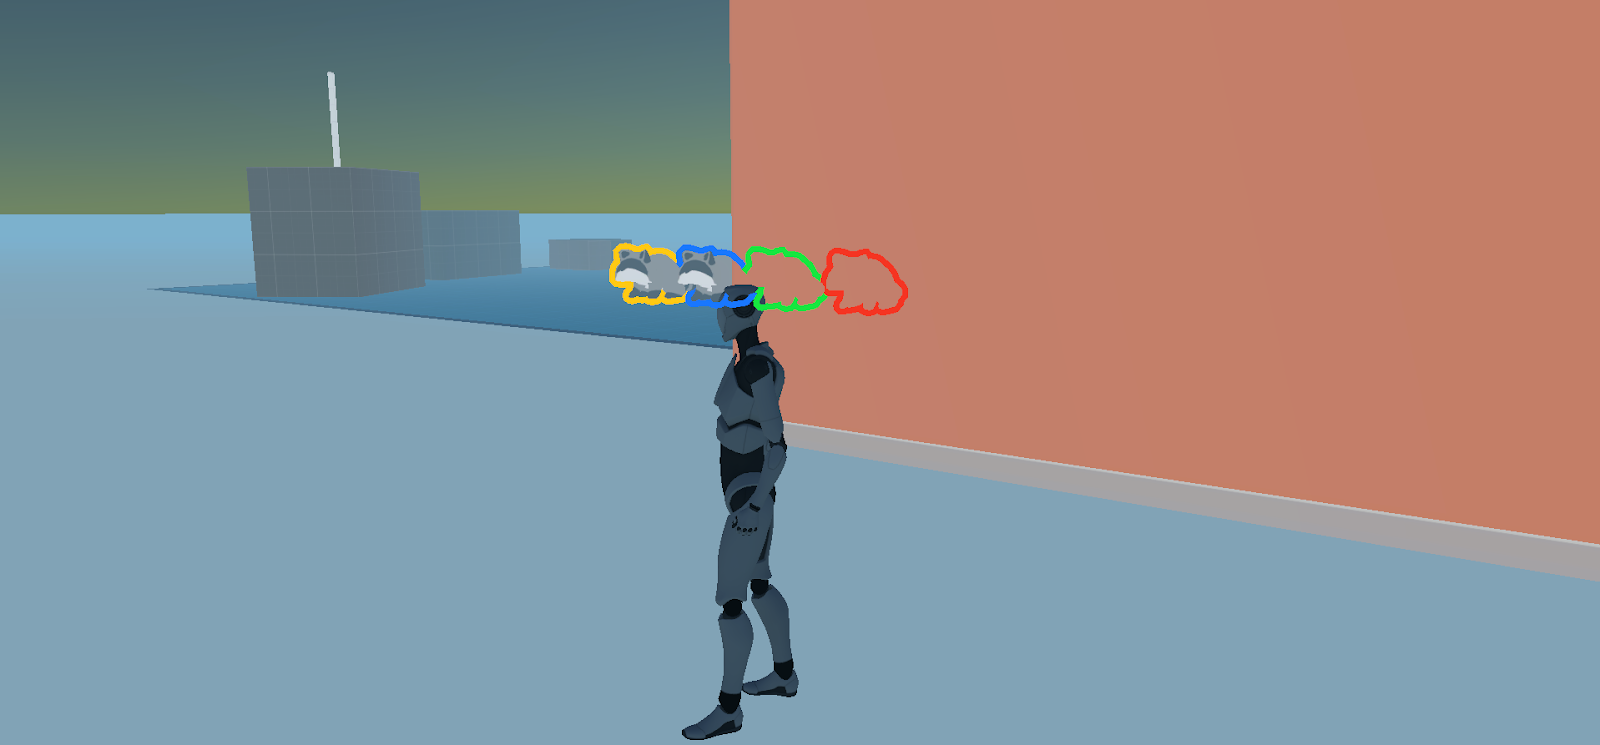
Another feature of the outliner is that the characters, using the outliner script, are still visible even when they move behind objects like buildings for example. This will further increase the readability of the different players and will help with gameplay.
In the future, we would like to make an outliner script where we also have the possibility of adding some opacity to the outliner, so the colors aren’t quite as harsh.
how do we get a flat color shader?
To fit with our chosen art style, inspired by for example Donut County and Untitled Goose Game we needed to be able to see the base colors of our textures without any extra influence of lights or shadows on our objects. As seen below.


How we tackled this is as follows. First, we used a 3D template from Unity itself where we already get some objects like boxes and the essence of a building. But we also get some lights, already implemented in the scene. Since we don’t need the lights we delete them.
Then all the objects provided in the template scene became quite dark and unreadable so we had to fix that.
The way we fixed it is by creating new materials. By default, the new materials use the “Universal Render Pipeline/Lit” shader, but since we don’t need a ‘lit’ shader to get to our goal art style we change the shader to “Universal Render Pipeline/Unlit”. And together with our flat color textures, this gave us the desired result.


Testing the camera in unity
The next thing we wanted to tackle was our camera angle.
We already had made a small prototype of how we wanted our camera to face players before, but not yet in Unity.
The picture you see here is one of an earlier prototype, made in Unreal Engine, where we set on a Field of View of 70.
Translated to Unity it looks like this:


The difference between the two pictures is that the picture on the left uses the ‘Perspective’ setting of the camera inside Unity, while the other uses the ‘Orthographic’ setting.
Considering the look we want to go for, we will be using the ‘Perspective’ setting for our cameras.
Modularity
we decided to make our houses as modular as possible since the houses are very basic shapes and don’t require much detail. That way we can quickly make new houses by changing colors in the texture and/or mashing several pre-made modular pieces into each other to make a bigger house for example.
Here you can see the pieces used for the current prototyping:

The pieces consist of: a base house (8mx10m), another base house (5mx7m), a roof, a window (with glass), a window raster, window shutters, a door (with doorknob), a doorframe, and a trashcan.
Going further we will be making more modular pieces to broaden our options in making unique looking homes for the player to look at while collecting their precious trash.
Garbage truck
We made a simple garbage truck that has a list of vector2 points to follow and when the last point is reached, then the truck will go towards the first point and will repeat this process.
The truck has an adjustable movement speed and a rotation speed and since the camera follows the truck this way you can make the game play faster or slower.
Character movement
Because character movement is so important to the core of our game. We made sure to make it work as smoothly as possible. Many of these small features in the character movement are things that the player wouldn’t even notice. However, the player would notice it if those features weren't there. Some examples of these features are:
Coyote time: after the player falls off of an object, the player will still be able to jump, for about 0.1 seconds, even though they’re not on the ground anymore. This will compensate for the player’s lack of pixel perfection. If this feature wasn’t there, the player would feel as if the game didn’t pick up their input.
Similar to coyote time is the pre-jump time. When a player lands on the ground and instantly wants to jump again, they’ll time their jump to their landing. Because of the lack of pixel perfection in the player, however, it’s possible the player will jump right before they hit the ground. To compensate for this the game will remember your input for about 0.1 seconds. When you then finally make your landing the game will process your jump.
Acceleration, max speed, and deceleration. Every game has this, but there are many ways to implement this. Acceleration and max speed are very easy to implement, however, deceleration is a bit trickier than it appears at the surface. The easy implementation is to multiply the player's speed with a friction value, however, this has a few problems. Our main problem with this approach is that the deceleration value will influence the acceleration as well. Because of this, it will be hard to tweak the values to something that feels right, as changing one of the 2 will force us to change the other as well. A quick google search didn’t provide us with solutions to this problem, so we decided to come up with a new way of giving the player deceleration. To decelerate the player, we use the dot product to figure out how much the player is going in its desired direction. We can use this to figure out how much deceleration needs to be applied. This allows us to configure acceleration and deceleration independently, permitting quick tweaking of values to get the exact values we think are good.

Art bible & prototype
Lastly, as we finish up most of the designing phase and are entering a phase of more prototyping and making game assets we have now completed our art bible which is a full reference guide to the designing of all elements in our game so everything feels coherent and blends well together, hopefully, we can quickly get a prototype with cool looking assets in your hands but for now, you can already enjoy our basic movement prototype that will be uploaded with this devlog.
that's all for this week,
next week we'll be here again with a new update on our progress so be sure to stick around to see our progress
Cya later fellow trash pandas.
Leave a comment
Log in with itch.io to leave a comment.